Saturday, March 31, 2012

Happy Birthday Pink Cake Card

My Saturday card creation features a striking pink and black color combination.  The focal point of the card is a dimensional Happy Birthday pink cake.  The cake image was easy to cut out and gives the card the desired effect I was looking for.

Supplies used:  Recollections black folded card, pink cardstock, white cardstock, patterned paper by Paper Studio (Black & White Sketchy Ornate #234534 & Pink w/ Black Polka Dots #466201), Hero Arts rubber stamp (K5315 Birthday Gift), ColorBox chalk ink pad in Blackbird, corner rounder, Jolee's boutique dimensional stickers (Baby Gems Flowers, 50-20144),X-Acto knife,  Sakura Gelly Roll pen in Clear Star, and Sticky Doos by Paper Studio.

Happy Birthday Pink Cake Card Directions:   
  1. Trim ornate patterned paper, ink edges, and adhere to card.
  2. Trim polka dot paper, punch corners, ink edges, and adhere to card.
  3. Stamp image on pink cardstock and cut out into four separate pieces.  Use X-Acto knife to trim ribbon detail.
  4. Stamp image on white cardstock, trim, punch corners, ink edges, and adhere to card.
  5. Use Gelly Roll pen to accent cake pieces, place flower sticker as shown, and attach to card with Sticky Doos or foam tape.

Friday, March 30, 2012

Stampin' Up! Club Card

Stampin' Up! Club Card
When I've look through card making magazines I noticed a reference to Stampin' Up! products.  The paper and designs have caught my eye on several occasions.  A couple of weeks ago I finally looked them up.  I found a local demonstrator and joined her monthly Stampin' Up! club.  Last night I attended my first meeting.  I'm excited to share the card I made featuring new product that will be released in April called Summer Smooches.  The colors are bright and cheerful and should help your creativity explode with ideas.

The design and products were supplied by Stampin' Up! demonstrator Amy Watson.  Here is a link to her website: http://amywatson.stampinup.net

Thursday, March 29, 2012

Easter Wishes Lamb Card

This week my goal is to get all my Easter cards made.  The digi stamp I found back in January of an adorable lamb should help me get the job done.  The card featured today is made with the digi stamp from Peppercus-design.  If you're searching for free digi stamps here is a great blog to try, http://freedigitalstamps.blogspot.com/.  There are a lot of great digi stamp alternatives to choose from.

Easter Wishes Lamb Card Supplies used:  Pale yellow cardstock, patterned paper by Basic Grey (euphoria/eden/eup-128), pearlescent solar yellow cardstock by Wausau Paper, white cardstock, computer, printer, ribbon by Creative Impressions, digi stamp by http://peppercus-design.blogspot.com/2012/01/digi-stamp-freebie-schaf-madel.html, clear stamp by Studio g, VersaMark watermark stamp pad in Champagne, pearlustre embossing powder by Stampendous! in Jade Pearl, heat embossing tool by Paper Studio, corner punch and yellow brads.

Easter Wishes Lamb Card Directions
  1. Make card from cardstock, 6.25" x 4.5".
  2. Trim patterned paper, wrap ribbon around paper piece, secure with tape, and adhere.
  3. Print image on white cardstock, stamp sentiment and emboss.
  4. Trim to desired size, corner punch, and layer with pearlescent paper.
  5. Attach brads and adhere.

Tuesday, March 27, 2012

Using Sketches

There are many ways to find inspiration for a card design.  Sometimes I sit down and gather my materials and create as I go.  I may look at a card making magazine and find an idea that spurs my creativity.  If I'm at a complete loss on where to start, using sketches from Paper Crafts Magazines on Pinterest can really help.  The card featured today was created using a sketch from the provided link.  Using sketches allows you to visualize your card with your materials.  I followed this sketch fairly close but you can mix it up and add detail however you want.  That's one thing I love about card making one sketch can have endless possibilities. 

Supplies used:  Pink cardstock, white cardstock, K & Company designer mat pad (Julianne, 30-657113), Hero Arts chalk ink in Iris, TPC Studios clear stamps (Greetings set, ST93416), pink glitter flower, La Mode 3/8" pearl flower button (style 46455), and Recollections adhesive faux pearls.

Directions:
  1. Make card using pink cardstock, 4.25" x 5.5".
  2. Trim and adhere white cardstock.
  3. Trim, ink edges and adhere patterned paper; punch or cut out circle, ink edges and adhere.
  4. Stamp image, ink edges of cardstock strip, layer, and adhere.
  5. Attach faux pearls, sew button onto flower and adhere.

Sketch from http://pinterest.com/papercraftsmag/free-card-sketches/

Monday, March 26, 2012

50% Off Spare•Parts


It's time for find a deal Monday.  Today I found a great deal on Spare•Parts by Paper Studio.  The advertised special at Hobby Lobby is 50% off all Spare•Parts.  I decided to stock up on decorative brads and paper flowers.  Retail price of the large brad assortments and paper flowers are $4.99 (50% makes them $2.495 each).  The spring epoxy brads are $3.99 ($1.995) and the flower brads $2.99 ($1.495).  My Spare•Parts total today was $15.965 before tax.  Don't forget to take along the 40% coupon to use on an item of your choice.  This is how I purchase my Copic markers.  The advertised sale is good through March 31, 2012. 

Sunday, March 25, 2012

Floral Cat Happy Birthday Card

At our house the cat is the pet of choice.  When I found the rubber stamp used on the floral cat happy birthday card I knew it had to be mine.  This stamp is very versatile and can be used for many different occasions.

Supplies Used: Purple cardstock, patterned cardstock by Paper Pizazz, Gemstone cardstock by Core'dinations in Amethyst, Fiskars upper crest edge punch, Stampendous! rubber stamp (F151 Bea Fluffies), TPC Studio clear stamps (Greetings set ST93416), Colorbox chalk ink in Blackbird, eksuccess thin-tipped marker set, Copic markers in Amethyst (V17) and Skin White (E00), Offray ribbon (sku#388241 from Michaels Stores Inc.), and ribbon adhesive by Glue Arts.

Floral Cat Happy Birthday Card Directions:
  1. Make card from purple cardstock, 4.5" x 6.25".
  2. Trim patterned paper and adhere.
  3. Edge punch white cardstock and use amethyst Copic marker on edges; layer with plaid paper, attach ribbon, and adhere.
  4. Stamp image and sentiment; color image, layer, and adhere.
  5. Attach bow.
In case you're wondering, I wrapped a piece of ribbon around the plaid and cardstock layer and secured the ribbon to the back with tape.  At the end tie a bow and attach with ribbon adhesive.

Friday, March 23, 2012

Handyman Thank You Card

Recently my father-in-law helped my husband fix a few things around our house.  I knew that not any thank you card would do.  This called for a handmade handyman thank you card.  Several weeks back I purchased the perfect paper for the project from my favorite scrapbooking store, Sooner Scrapbooks.  The paper is by Karen Foster Design (#60626 Measure Twice and #64448 Tool Time).  This paper could also be used to create a fun Father's Day card.  Hopefully this will inspire you to create a handyman thank you card for the Mr. Fix-it in your life.

Supplies used:  Recollections black folded card 4.5" x 6.25", Karen Foster Design patterned paper, Bazzill Basics black dotted swiss cardstock, Hero Arts rubber stamp (D5510 Tall Thank You), Colorbox chalk ink in Blackbird and Charcoal from Cat's Eye stack, and hammer sticker from Jolee's dimensional stickers (Tool Box SPJJ067).

Handyman Thank You Card Directions:
  1. Trim tool time paper, ink edges and adhere to card.
  2. Trim cardstock strip; adhere.  Trim measure twice paper, ink edges, and adhere.
  3. Stamp sentiment, ink edges, layer, and adhere.
  4. Attach sticker.

Wednesday, March 21, 2012

Complementary Color Card

Complementary color cards can be very beautiful.  For the card featured I went with a purple and green color scheme.  If you don't know what colors complement each other check out the color scheme designer website, http://colorschemedesigner.com/.  This card has a less is more approach.  I wanted the focal point to be the stamped and colored image. The final look is a simple, savvy handmade card.

Supplies used:  Recollections white card 4" x 5.5", purple, green, and white cardstock, Core-dinations Gemstone cardstock in jade (GX-GEM270), Fiskars floral edge punch, Inkadinkado rubber stamp (Wishing you Sunny Days ahead, 60-00117), ColorBox chalk ink in blackbird and lavender from the Cat's Eye stack, eksuccess thin-tipped markers, and The Paper Studio Sticky-Doos or foam tape.

Complementary Color Card Directions:
  1. Trim purple cardstock and edge punch.  Trim green cardstock; adhere to card.
  2. Stamp image and color.
  3. Distress edges of gemstone cardstock with scissors, ink edges, layer with image, and adhere to card with sticky-doos or foam tape.

Hot Buy on Corner Punches

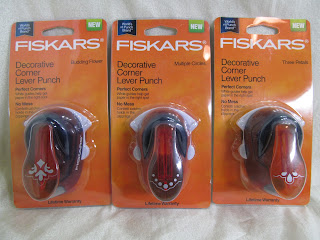
One thing I love is a good deal!  Today while shopping at Jo-Ann fabric and craft store  I came across a hot buy on corner punches.  A select few Fiskars brand corner punches were marked on clearance.  The normal retail price is $9.99, the clearance tag was marked $4.97 but when I checked out the price came up $2.97.  I bought three punches for less than I could buy one at regular price.  These punches will be great tools to add detail to card making projects.  As far as I can tell this is in store merchandise.  I looked on their website and didn't find the punches purchased. 

Corner punches purchased:
  • Budding Flower, #01-005479
  • Multiple Circles, #01-005489
  • Three Petals, #01-005488
Adding tools to your stash can be costly.  Finding a hot buy on corner punches really helps with the card making budget.  Check back to find out how I use the new punches in a card design. 

Tuesday, March 20, 2012

Color Scheme Makes a Difference


Color scheme makes a difference in your card designs.  With this example I took a simple design and used two different color schemes.  The black and white has a bold look and the blue tones are more subtle.  This card design can be used with many different sentiments and patterned papers for a completely different look and feel.  When I'm picking the color scheme for a card I try to think about the recipient and their likes and interests.  It was raining when I made the blue tone card and I think that had an affect on my color scheme selection.  The black and white card is one of the first cards I made when I started card making.  Looking at the two together it's easy to see how details and color scheme makes a difference.  Just remember to have fun and don't be afraid to experiment with color.  If you need a place to start check out the color scheme designer by clicking this link:
http://colorschemedesigner.com/

Supplies for Blue Floral Thinking of You Card: 

Monday, March 19, 2012

Birthday Monkey Card

The monkey has become a popular trend in the clothing and crafting worlds.  This birthday monkey card can be made for a young boy or girl.  I picked a boyish color scheme but you could duplicate this design and give it a girly feel with just a few changes.

Supplies used:  Recollections white card 4" x 5.5", white cardstock, Confetti designer mat pad by K & Company, Stampabilities balloons rubber stamp (NR1025), Stampendous monkey rubber stamp (E221 Changito Solo), Hero Arts clear Happy Birthday stamp (CL414, classic messages), ColorBox Chalk ink pad in blackbird and warm red, Copic markers in dark suntan (E15), cardinal (R59), manganese blue (B34), amethyst (V17), K & Company grand adhesions (Happy Birthday 2U!, 30-572188), and The Paper Studio Sticky-Doos or foam tape.
Birthday Monkey Card Directions:
  1. Trim designer mat paper and adhere to card.
  2. Trim accent paper and adhere.
  3. Stamp images on cardstock and color as desired.  Ink edges of cardstock and adhere to card.
  4. Stamp sentiment, ink edges, layer, and adhere with sticky-doos.
  5. Accent with star stickers.
If you don't have Copic markers, any marker or colored pencil will do. 

Saturday, March 17, 2012

Where to Buy Supplies

Where to buy supplies for your card making and crafting hobbies?  Access to scrapbooking and crafting stores vary greatly depending on your geographical location.  I live in the Tulsa, Oklahoma area and we have several options to choose from.  Here are my favorite retailers for card making and crafting supplies:
  • Sooner Scrapbooks, my friend owns the store.  Tell her Andrea sent you.
  • Jo-Ann Fabric and Craft Store
  • Michaels
  • Hobby Lobby
If you don't have access to these retailers you can also find some supplies at big box retailers like Target and Wal-Mart.  If you really want to have fun and you like to shop online you can find endless places to buy supplies.  A few of my favorite online sources include:
Personal preference and style will influence what retailers and manufacturers you like.  Sometimes if I can't find what I'm looking for I will check www.ebay.com, and you will be surprised what you can find.  Just have fun!   

Wednesday, March 14, 2012

St. Patrick's Day Card

In the mood for something Irish?  Why not make a St. Patrick's Day card.  This design can be easily duplicated or modified to use the supplies you have on hand.     

Supplies used: Recollections white folded card 4" x 5.5", The Paper Studio Scribble Shamrocks patterned paper, Core'dinations Gemstones cardstock in Pearl, white cardstock, The Paper Studio ribbon trends in Polka Dot Green, Hero Arts chalk ink in Grass, ColorBox chalk ink in Blackbird, Studio g clear stamps (VC0045), Jolee's boutique dimensional sticker Pot of Gold Repeats (50-20530), Copic marker in Emerald Green (G05), and adhesive tape runner.

St. Patrick's Day Card Directions:
  1. Trim, ink edges, and adhere patterned paper.
  2. Cut ribbon, attach to gemstone cardstock and adhere.
  3. Stamp sentiment, color shamrocks, layer, and adhere.
  4. Attach pot of gold sticker, and bow.

Floral Thank You Card

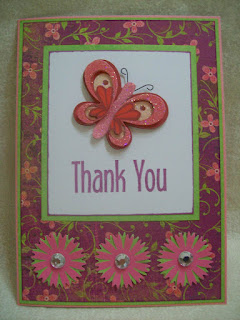
You don't have to spend a lot of money to make beautiful cards.  I'm a firm believer in working with what you have.  With this floral thank you card if you don't have a butterfly sticker a butterfly rubber stamp would work just fine.  With this design several sentiments could be used, thinking of you, miss you, just because, etc.  So don't be afraid to mix it up a little. 

Here are the supplies I used: Recollections folded cards in pink 4.5" x 6.25", The Paper Studio texture paper in lime, Basic Grey green at heart patterned paper (m-gah-2134), white cardstock, pink cardstock, Hero Arts chalk ink in iris, Hero Arts rubber stamp Thank You (D5510), K & Company Sweet Nectar Grand Adhesions dimensional butterfly stickers (30-662070), Martha Stewart Cornflower punch, Recollections rhinestones, paper trimmers, and adhesive tape runner.

Floral Thank You Card Directions:
  1. Trim background papers, ink edges if desired, and adhere to card.
  2. Measure the butterfly sticker and the sentiment to determine how big to make the focal point.  Trim papers to measurements leaving the accent paper a little larger for layering.
  3. Stamp sentiment, ink edges if desired, layer, adhere to card and attach butterfly sticker.
  4. Punch flowers, layer together, adhere to card, and attach rhinestones.

Tuesday, March 13, 2012

Getting Started

Making cards was a progression from my scrapbooking hobby.  One day I needed a card and I had a ton of beautiful paper, stickers, and supplies laying on my craft table and I decided I would make the card I needed.  I then enrolled in a couple of card making classes to learn some new techniques and have been hooked making cards since.  Tomorrow I will have a basic design for you to start with.  Getting started you will need the following supplies:
  • Cardstock or blank ready made cards
  • Paper trimmers
  • Tape runner adhesive
  • Decorative paper
  • Your favorite rubber stamp
  • Ink pad
  • Small flower punch
  • Rhinestones and butterfly sticker
I look forward to sharing my knowledge and excitement for card making with you.